// Guide
Wheel bearings — the cheap part that quietly wrecks your hubs
A wheel bearing rarely seizes — it goes slack and notchy for months first, and a worn one chews the hub and lets water in. Here's how to catch one before it costs you a wheel.
Updated 15 May 2026
A wheel bearing almost never seizes. There’s no bang, no locked wheel, no moment you can point to. It just goes slack — a fraction of play this month, a touch of notchiness the next — and because the change is that slow, you stop noticing. You blame the tyre. You blame the forks. You tell yourself the bike’s always felt a bit vague through fast corners.
It hasn’t. And while you’ve been adjusting around it, the worn bearing has been quietly hammering its own seat in the hub.
This guide is how a wheel bearing really wears, the two checks that catch one in a minute, and why the cheapest part in your wheel is the one you don’t ignore.
How a wheel bearing wears out
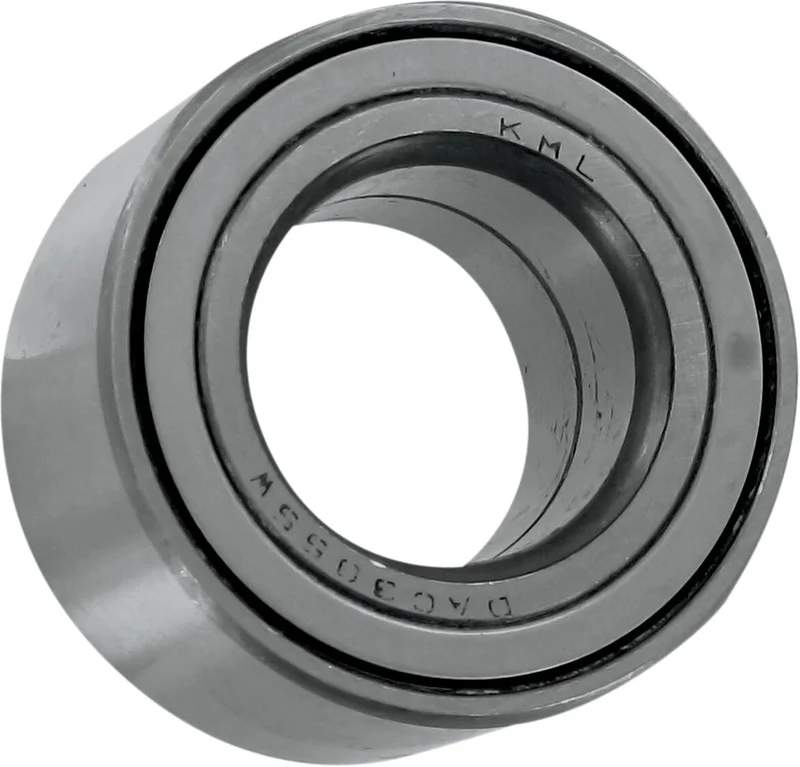
A modern dirt bike runs sealed cartridge bearings — a steel ball race packed with grease, capped each side by a rubber seal, pressed into the hub. Two per wheel, one each side, with a spacer tube between them. They’re sealed for life in theory. In a motocross hub, life is short.
They aren’t all the same bearing, either. Most hubs take a single-row sealed bearing each side, but plenty of modern bikes run a wider double-row bearing on one side to carry the extra load — and the two are not interchangeable. It’s the first reason a wheel bearing kit has to be matched to your exact hub rather than guessed off a number.
Wear runs in one direction. The seal is the first thing to give — flexed, blasted, eventually breached. Once water and fine grit get past it, the grease emulsifies and stops protecting the balls and races. The polished steel surfaces start to pit. Pitting becomes roughness, roughness becomes play, and play lets the bearing knock about in a hub that was machined for a tight press fit.
None of it is sudden. That’s the trap. A bearing gives you months of warning in a language you have to get the wheel off the ground to hear — and by the time you can feel it through the bars, it’s well down the road.
The play check
This is the first test and it takes thirty seconds. Get the wheel clear of the ground on a stand.
Grip the rim — or the tyre — at the top and bottom, twelve and six o’clock, and rock it firmly in and out against the hub. Then do it again at three and nine. You’re feeling for a knock: a tiny dead movement, a click, the wheel shifting on its axle when it shouldn’t move at all.
A healthy wheel is solid. No knock, no click, nothing. Any detectable play at the rim is play in the bearings, and play means they’re done.
One thing to rule out first. A knock can also be a loose axle, or — on the front — worn steering-head bearings throwing you a false reading. Check the axle nut is to torque before you condemn the wheel bearings, and feel where the movement actually comes from. Movement at the hub is the wheel bearing. Movement at the headstock is a different job.
The spin-and-feel check
Play tells you a bearing is finished. The spin test catches one earlier, before the play arrives.
Spin the wheel by hand — not hard, just enough to turn it through a few rotations — and rest a fingertip on the axle or the hub face. A good bearing is glass-smooth and near silent. The wheel coasts, slows evenly, and you feel nothing through your finger but a steady, even turn.
A worn bearing tells on itself. You’ll feel notchiness — a faint catch and release as the pitted spots in the race pass under the balls. You might hear a dry rumble or a fine grinding. The wheel can slow unevenly, almost stepping, instead of coasting down clean.
Do both checks together at every wheel-off job — every tyre change, every brake service. Notchy but no play yet means a bearing on the way out: order the kit, plan the job, ride the rest of the meeting. Notchy and knocking means it’s overdue.
What a worn bearing feels like on the ride
The wheel-off checks are how you confirm a bearing. But the bike drops hints between services, and once you know them you stop blaming the wrong parts.
- A hum or drone that rises with speed. A dry, rumbling bearing makes noise in proportion to wheel speed — the faster you go, the louder it gets. It hides easily under engine and exhaust, so listen on a closed throttle, coasting.
- A vague, wandering front end. Play in a front bearing lets the wheel shift fractionally under cornering load. The front feels imprecise and slow to settle — exactly the symptom riders pin on tyres or tired forks.
- A rear that steps out under power. Play in a rear bearing lets the wheel move off true as the chain loads it. The back of the bike feels loose and disconnected on the drive.
- Brake judder or a disc that rubs. A wheel that rocks on slack bearings can’t hold the disc square in the caliper. You get an inconsistent lever and a faint rub — caused by the bearing, not the brake.
One of these on its own earns a wheel-off check. Don’t ride a season of vague handling and rebuilt brakes chasing a fault that’s two cheap bearings.
Front and rear wear differently
Check both wheels, but don’t expect them to wear at the same pace. They live different lives.
The rear works harder and dies first. It carries more of the bike and rider’s weight, it takes the drive load fed through the chain and sprocket, and it sits low in the worst of the roost, mud and standing water the bike throws up. On most bikes the rear wheel bearings are the first set you’ll replace, and on a wet enduro bike they can go in a single hard season.
The front has an easier time of it for grip and drive, but it pays elsewhere — it takes the full hit of every landing and every hard braking bump straight through the hub. Front bearings usually outlast rear, but a missed landing or a long run of braking ruts can still finish one early.
And the rear hides a bearing riders forget entirely. The rear sprocket doesn’t always bolt straight to the wheel — on many bikes it mounts to a separate sprocket carrier that spins in the cush-drive hub on its own bearing. That carrier bearing sits right behind the chain, in the worst of the roost, and it wears like any other. When the rear wheel is apart, give it the same play and spin tests. A neglected carrier bearing seizes the cush drive and chews the carrier — another cheap part taking an expensive one with it.
Check the pair on each wheel, check the carrier, and when you’re in the rear, look harder. That’s the end of the bike that’s been working.
What kills bearings early
A wheel bearing should give you seasons. Plenty die in months, and it’s almost always one of these.
The pressure washer. The single biggest killer. Hold a lance close to the hub and you drive water straight past the seal and into the grease — exactly the thing the seal exists to stop. Wash the bike, but keep the lance back from the hubs and never aim it square at a bearing seal.
Deep water and bog. River crossings and waterlogged ruts do the same job more slowly. Every submersion is a chance for water to work past a flexing seal.
A seal that’s already gone. Once one seal is breached, the bearing behind it is on borrowed time. Spot a damaged or displaced seal and treat the bearing as suspect.
Axle torque, wrong either way. An axle nut left loose lets the wheel work on the bearings and pound them slack. Over-tighten it and you can preload the bearings hard against a too-long or missing spacer, loading them where they were never meant to be loaded. Torque the axle to the manual figure — that number protects the bearings.
Riding a notchy one. The cheapest mistake on the list. A rough bearing left in service grinds itself into full play, and play lets it hammer the hub bore oversize. The bearing was always cheap. The hub is not.
How often you get the wheels off the ground and run the checks depends on what you ride and where:
| Riding | Check the bearings |
|---|---|
| MX racing / hard enduro | every 10–15 hours, and after any deep-water ride |
| MX practice / trail | every 20–30 hours |
| Dry green-laning / casual | a couple of times a season |
| After every pressure-wash | a quick play check costs nothing |
These are check intervals, not replacement intervals. A wheel bearing gets replaced when it fails the play or spin test — never on a clock, and never before.
Why you replace the set
When one bearing in a wheel is done, both bearings in that wheel are done. Replace them as a pair, every time.
The logic is the same one that applies to a chain and its sprockets. The two bearings have run identical hours, in the same hub, through the same water and grit. If one has worn far enough to feel, the other is right behind it — it simply drew the slightly better side of the hub. Fit a single new bearing next to a survivor and the tired one carries its share of the load badly, runs rough, and wears your fresh bearing early. You’ll have the wheel apart again inside a season.
It’s one stripdown, one kit, one afternoon. Both bearings, both seals, and check the spacer while you’re in there. Do the wheel properly once instead of half of it twice.
The bearing, the seals, the spacer
A wheel bearing job is three parts, not one — and the two that aren’t the bearing are the ones riders skip.
The bearings. The cartridge bearings themselves, sized to the hub bore and the axle. This is the part everyone remembers.
The seals. The rubber seals that sit outboard of the bearings and keep water and grit out of the hub. They are what failed first and let the wear start. Fitting new bearings behind tired seals is throwing the job away — a breached seal will have the fresh bearings rough again in no time. Renew the seals every time. They cost very little.
The spacer. The tube between the two bearings sets how the axle clamps the inner races. Reuse it only if it’s dead straight and the bearing faces haven’t dug rings into its ends. A bent or grooved spacer lets the axle preload the bearings wrong and wears them out early. If in doubt, replace it — it’s a cheap part to be sure of.
A proper wheel bearing kit bundles the bearings and seals as a matched set, often with the spacer, so the whole wheel gets done in one go from one box.
Fitting them without wrecking them
Wheel bearings are a genuine home job, and a satisfying one. There’s exactly one rule you cannot break: press only on the race that’s being moved.
Driving the old bearings out, work the spacer aside and tap the inner race from the far side, moving the punch around the race so the bearing comes out square rather than cocking in the bore. Driving the new ones in, push on the outer race only — a socket or a bearing driver that matches the outer diameter. Drive a bearing in by its inner race and you push the load straight through the balls, and you’ve damaged it before the wheel’s even built.
Clean the hub bore before anything goes back. Old grease, grit and any burrs left by the bearing that came out all stop a new one seating square — wipe it spotless and check the bore isn’t scored or stretched oversize. A bearing that drops in with no resistance at all has a hub problem, not a bearing problem.
Two things make the fit easy. Get the new bearing started dead square — a cocked bearing wrecks the hub bore as it goes in. And use temperature: warm the hub gently or chill the bearings in the freezer, and the press fit loosens enough that they almost walk in on their own. Seat the first bearing fully, drop the spacer in, then fit the second until it just touches the spacer — snug, not crushed.
If you haven’t got a way to support the hub and drive the bearing in square, that’s the moment to hand it to a shop. A bearing pressed in cocked takes the hub with it, and a hub costs many times what the bearing does.
The right bearings for your wheels
What you’re actually buying, and how to be sure it fits.
Quality over the cheapest listing. Wheel bearings are sealed cartridge bearings, and the gap between a budget bearing and a good one is real — better steel, better grease, a seal that actually keeps water out. On a bike that sees mud and pressure washers, the good kit pays for itself in the hours it lasts. Aftermarket bearing-and-seal kits from the established off-road brands match or beat the original equipment for sealing, and come complete in one box.
Buy the kit, not loose bearings. A wheel-specific kit gives you both bearings, both seals and usually the spacer, all matched to your hub. It saves you cross-referencing individual bearing numbers and guessing seal sizes at the bench.
Fitment is three numbers. The bearing bore and outer diameter, the hub width, and the spacer length — and the kit has to match all three. They change between makes, between models, often between front and rear on the same bike. Front and rear hubs are rarely the same, so order per wheel.
Everything here is fitment-specific — bearing size, seal size, spacer length all change between models. Filter by your bike and you’ll see only the kit that fits, which beats cross-referencing bearing numbers at the bench.
// In stock now
Wheel parts in stock
Bearings, seals, spacers, axles, spokes. Fitment varies by bike — filter by yours to see what fits.
ATHENA
ATHENA WHL BRNG FR YA
£21.95

ATHENA
ATHENA WHL BRNG FR YA
£21.95

ATHENA
ATHENA WHEEL BEARING 60/22 2RS-KOYO
£15.15

ATHENA
ATHENA WHEEL BEARING 6904/2RS1-KOYO
£14.13
ATHENA
ATHENA WHEEL BEARING 6304/2RSH C3-SKF
£12.16
ATHENA
ATHENA WHEEL BEARING 6303/2RSH C3-SKF
£10.50

ATHENA
ATHENA WHEEL BEARING 6204TN9/C4HLHT23
£9.30

ATHENA
ATHENA WHEEL BEARING 6302/2RSH-SKF
£8.76
// Find what fits your bike
Wheel bearings, sized to your bike.
Bearing bore, hub width and spacer length all change between models — and the kit has to match all three. Tell us the bike and we'll show you what fits, no part-number cross-referencing.
22,326 parts · 55 brands
// FAQ
Frequently asked questions
How do I know it's a wheel bearing and not the tyre or suspension?
Get the wheel off the ground and check it directly — that's the whole point of the play and spin tests. A vague, wandering front end with the bike on the stand and the wheel still tight and smooth is a suspension or tyre conversation. Knock at the rim or grinding through a spin is the bearing, full stop. Don't diagnose a bearing from the saddle; a worn one and tired forks feel alike at speed. Lift the wheel and you'll know in a minute.
Can I replace just one bearing if only one side feels rough?
No — do both, and the seals with them. The two bearings in a wheel live the same hours in the same dirt and water. The one that feels fine is simply behind the one that doesn't. Fit a single new bearing next to a tired one and the old one carries the load badly, wears the new one early, and you're back inside the hub before the season's out. It's one stripdown either way. Do the pair.
Do I need to change the seals and spacer too, or just the bearings?
Always renew the seals — they're cheap, they're what failed first, and a tired seal kills a fresh bearing fast. The centre spacer you reuse if it's straight and unmarked; replace it if the bearing ends have dug rings into it or it's bent. A proper wheel bearing kit bundles bearings and seals together, and often the spacer, so you're not hunting parts mid-job.
The bearing still spins — can I leave it?
A bearing that spins is not a bearing that's healthy. Once it feels notchy or rough, the races are pitted and it only gets worse — never better. Riding on it grinds the pitting into full play, and play lets the bearing hammer its seat in the hub. That turns a cheap bearing kit into a new wheel. Notchy means order parts, not ride on.
How long should a set of wheel bearings last?
There's no hour figure — conditions decide it. A dry-weather trail bike can run a set for a couple of seasons. The same bike raced through a wet winter, or pressure-washed after every ride, can finish a rear set in a few months. Water and grit past the seal are the multiplier, and the rear always goes before the front. Check them, don't count hours.
Can I fit wheel bearings at home?
Yes — it's one of the more satisfying home jobs. You need a way to drive the old ones out, a way to press the new ones in square, and the discipline to push only on the correct race. A socket that matches the outer race, a bench vice or a bearing driver, and a clean hub will do it. Heat the hub or chill the bearings and they almost drop in. Take your time getting them square — that's the only part that bites.